iPerfについて
iPerfはネットワークの速度を計測するベンチマークツールです。
各種OS向けのiPerfが用意されているため、LinuxとAndroid、WindowsとWindows間の速度計測など、様々な端末同士での速度計測ができます。
対応している端末は以下のものですが、オープンソースなのでこれら以外にも派生したツールがあるかもしれません。
- Windows
- Android
- iPhone / iPad
- Apple macOS
- Ubuntu / Debian / Mint
- Fedora / Red Hat / CentOS
- openSUSE
- Arch Linux
- FreeBSD
使い方も簡単なのでぜひ試してみてください。
サーバー側の準備
Linux
CentOSの場合はiperf3はBaseレポジトリに、EPELにiperf2がありましたのでyumなどでインストールします。
[root@aimix ~]# yum --showduplicates list | grep iperf
iperf.x86_64 2.0.13-1.el7 epel
iperf3.i686 3.1.7-2.el7 base
iperf3.x86_64 3.1.7-2.el7 base
iperf3-devel.i686 3.1.7-2.el7 base
iperf3-devel.x86_64 3.1.7-2.el7 base
サーバーとして待受けする場合は「-s」オプションを指定して起動するだけです。
iperf3 -s
待受状態になるとポート番号が表示されて以下のようになります。
[root@aimix ~]# iperf3 -s
-----------------------------------------------------------
Server listening on 5201
-----------------------------------------------------------
iPerf3はデフォルトの待受ポートが「5201」ですが、iPerf2は「5001」なので接続する場合は注意して下さい。
ベンチマークテストが実行されるとサーバ側にもクライアントと同様の結果が表示されます。
Windows
以下からダウンロードします。

CUIのツールで、使い方やオプションはLinux版と同じです。
zipを解凍したフォルダへ移動してコマンドプロンプトで以下を実行します。
iperf3.exe -s
待受状態になると以下のように待ち受けポート番号が表示されます。
S:\tmp\iperf-3.1.3-win64\iperf-3.1.3-win64>iperf3.exe -s
-----------------------------------------------------------
Server listening on 5201
-----------------------------------------------------------
Linux版も同様ですが、待受中のiPerfサーバへテストが実行されると、サーバ側にも以下のように実行状況が表示されます。
以下の場合は 192.168.2.200 から接続要求を受け入れましたよという感じです。
S:\tmp\iperf-3.1.3-win64\iperf-3.1.3-win64>iperf3.exe -s
-----------------------------------------------------------
Server listening on 5201
-----------------------------------------------------------
Accepted connection from 192.168.2.200, port 34880
[ 5] local 192.168.2.2 port 5201 connected to 192.168.2.200 port 34882
[ ID] Interval Transfer Bandwidth
[ 5] 0.00-1.00 sec 108 MBytes 910 Mbits/sec
[ 5] 1.00-2.00 sec 113 MBytes 945 Mbits/sec
[ 5] 2.00-3.00 sec 111 MBytes 935 Mbits/sec
[ 5] 3.00-4.00 sec 109 MBytes 912 Mbits/sec
[ 5] 4.00-5.00 sec 112 MBytes 938 Mbits/sec
[ 5] 5.00-6.00 sec 113 MBytes 945 Mbits/sec
[ 5] 6.00-7.00 sec 113 MBytes 945 Mbits/sec
[ 5] 7.00-8.00 sec 112 MBytes 939 Mbits/sec
[ 5] 8.00-9.00 sec 103 MBytes 868 Mbits/sec
[ 5] 9.00-10.00 sec 111 MBytes 927 Mbits/sec
[ 5] 10.00-10.03 sec 3.74 MBytes 902 Mbits/sec
- - - - - - - - - - - - - - - - - - - - - - - - -
[ ID] Interval Transfer Bandwidth
[ 5] 0.00-10.03 sec 0.00 Bytes 0.00 bits/sec sender
[ 5] 0.00-10.03 sec 1.08 GBytes 926 Mbits/sec receiver
Android
Google Playで「iperf」で検索すると結構出てきますが、クライアントのみ対応のものが多く、ネットワーク系の便利ツールに入っていることもあります。
今回は「Magic iPerf including iPerf3」を使いました。
非常にシンプルなツールですが、iperfクライアント、iperfサーバともに対応しています。

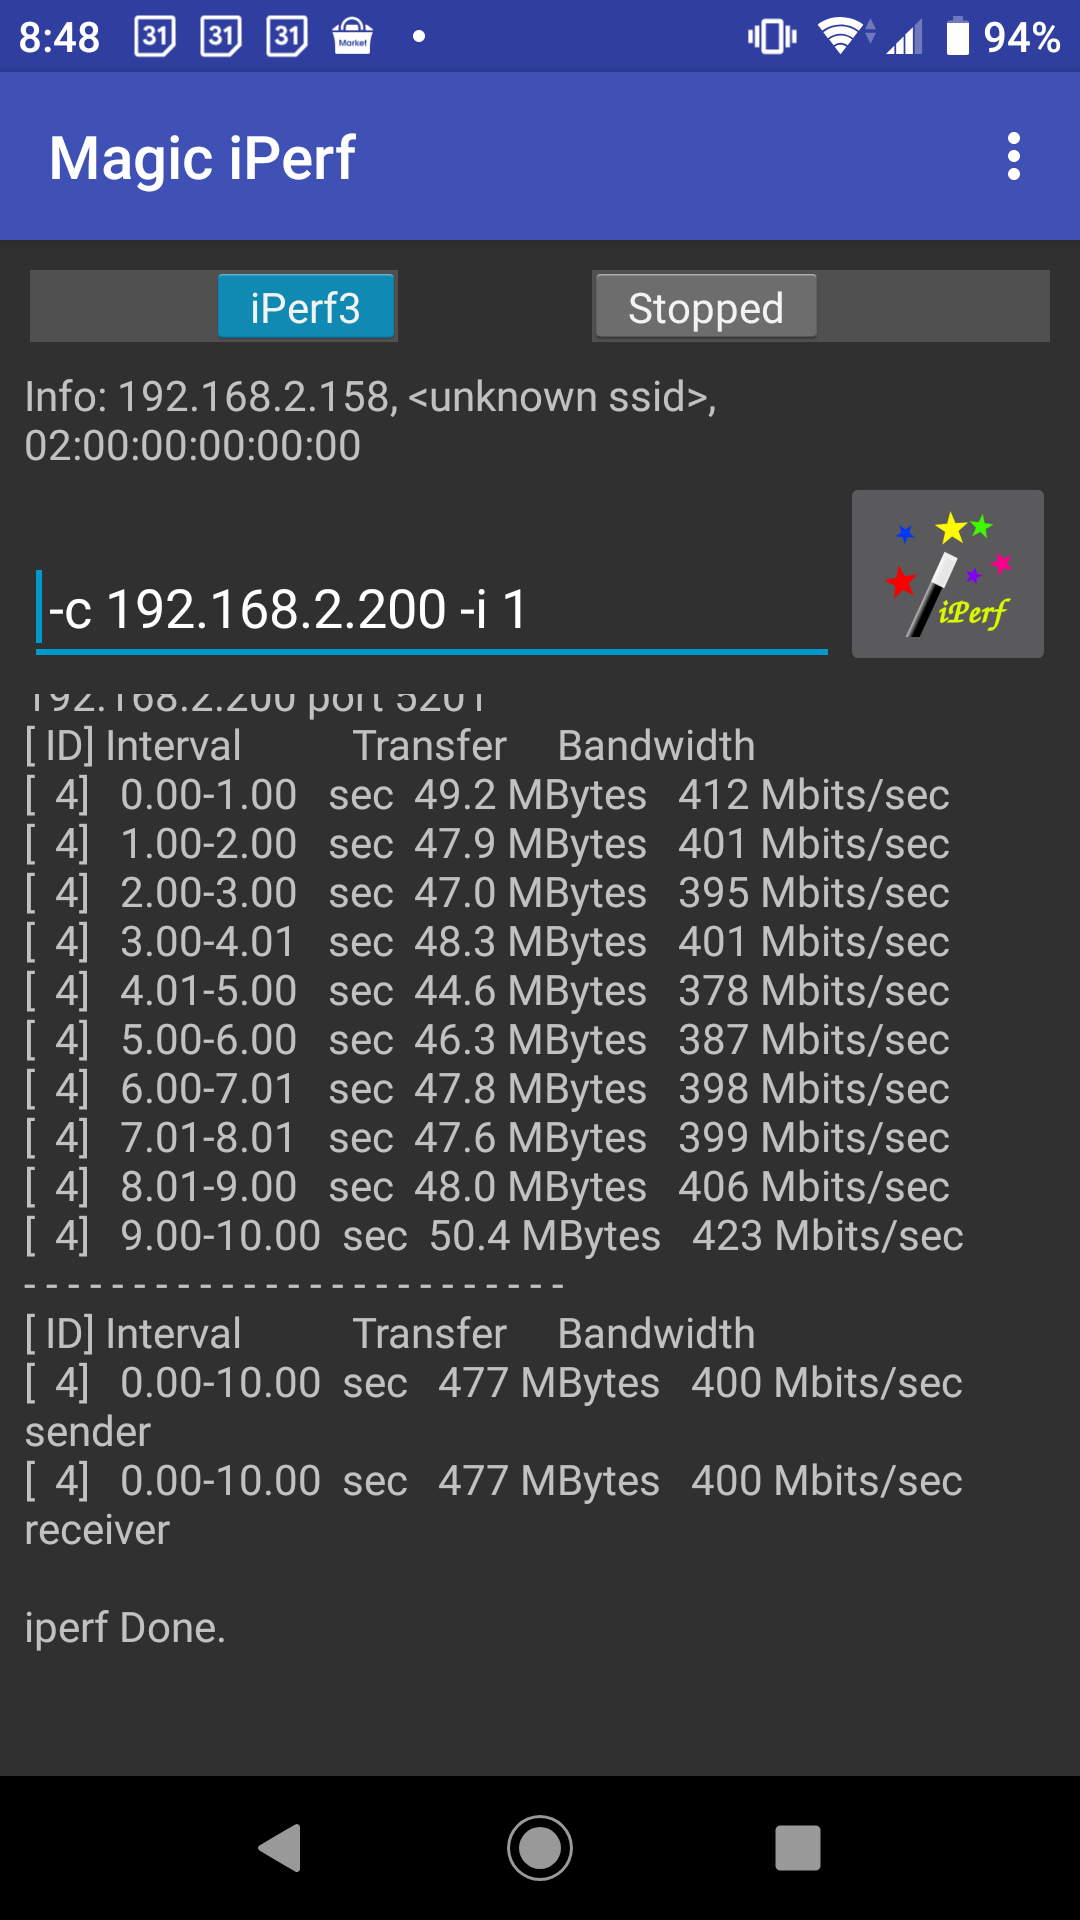
サーバとして動作させる場合は、オプション部分が「-s -i 1」になっているのを確認し、右の「Stopped」をタップして「Started」にすると待受開始します。
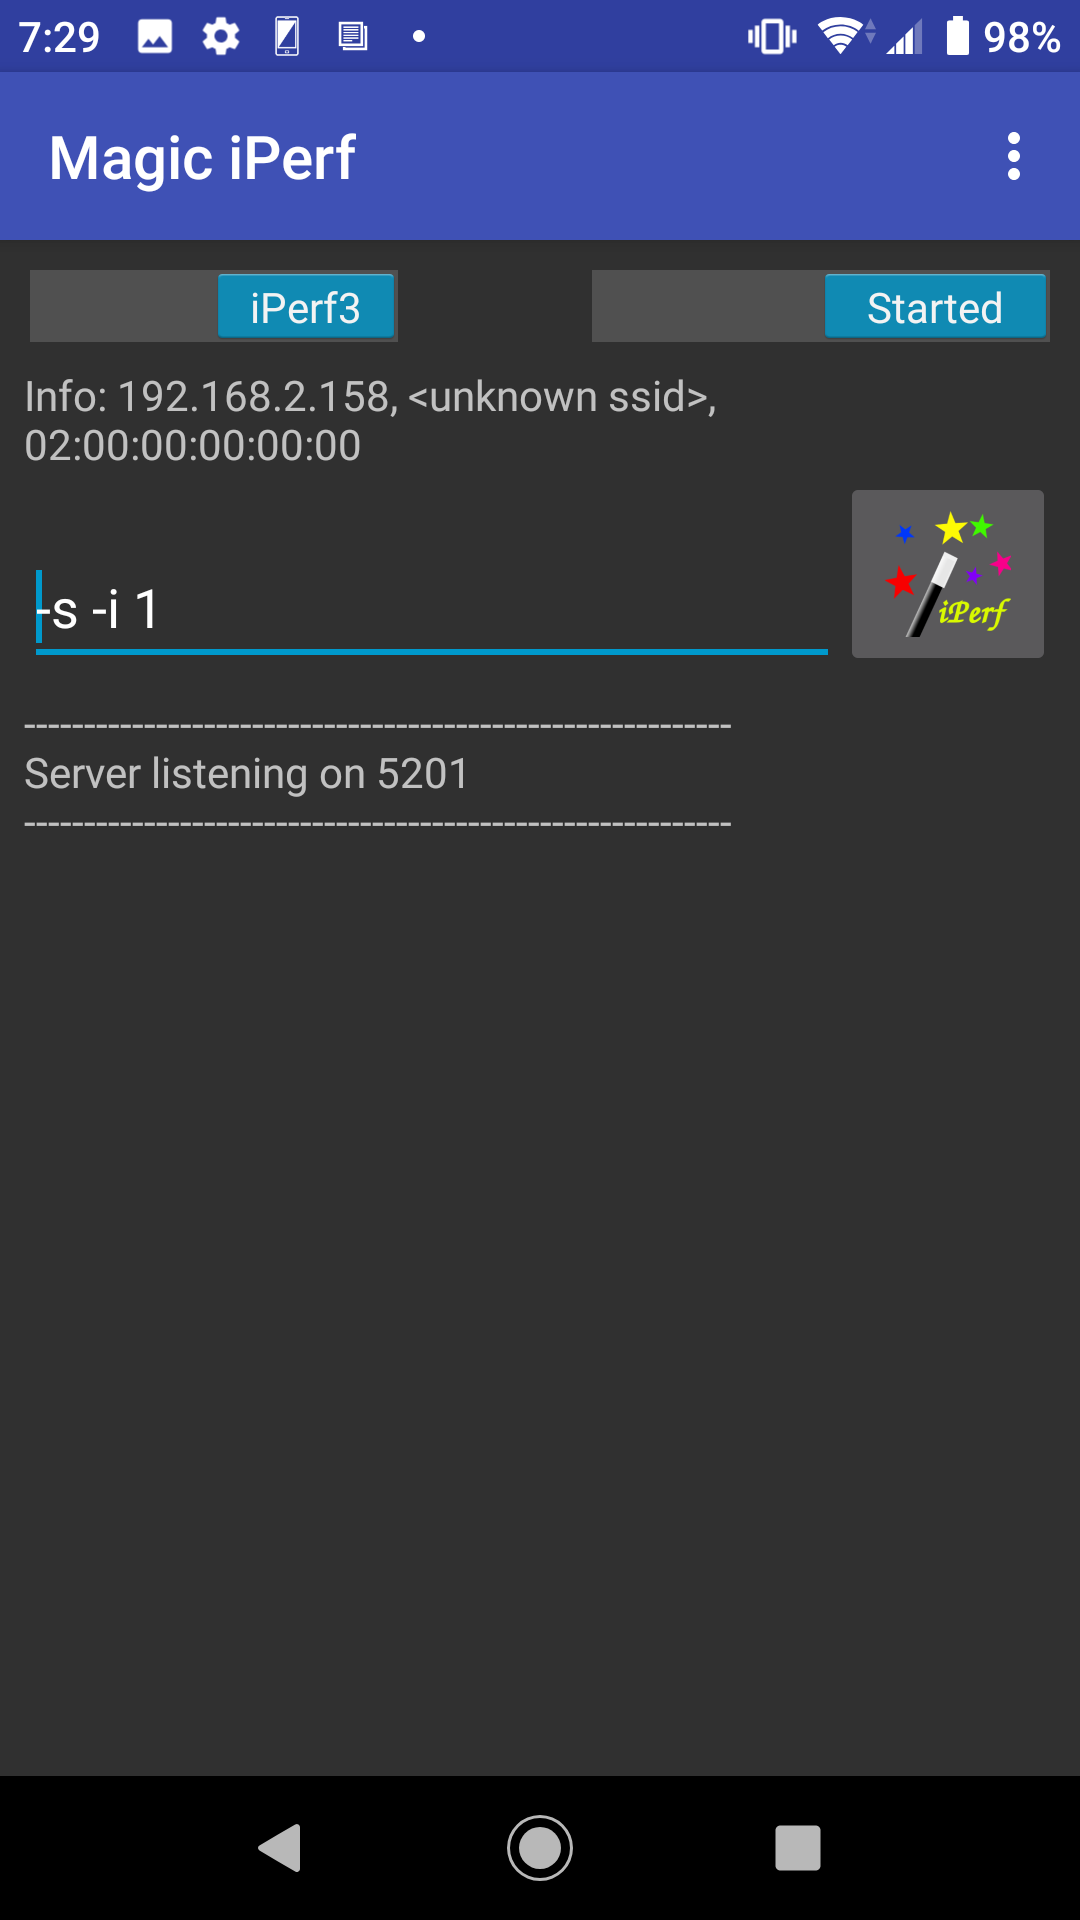
左上をタップすると「iPerf3」と「iPerf2」の切り替えができますが、iPerf3はデフォルトの待受ポートが「5201」、iPerf2は「5001」なので接続する場合は注意して下さい。
オプションは予めプリセットが用意されており、プリセットを追加削除したり、オプションも自由に修正可能です。
右端の「iPerf」アイコンをタップすると以下のように一覧が表示され、タップして選択後に「RUN」で選択オプションが指定された状態で実行画面に戻ります。
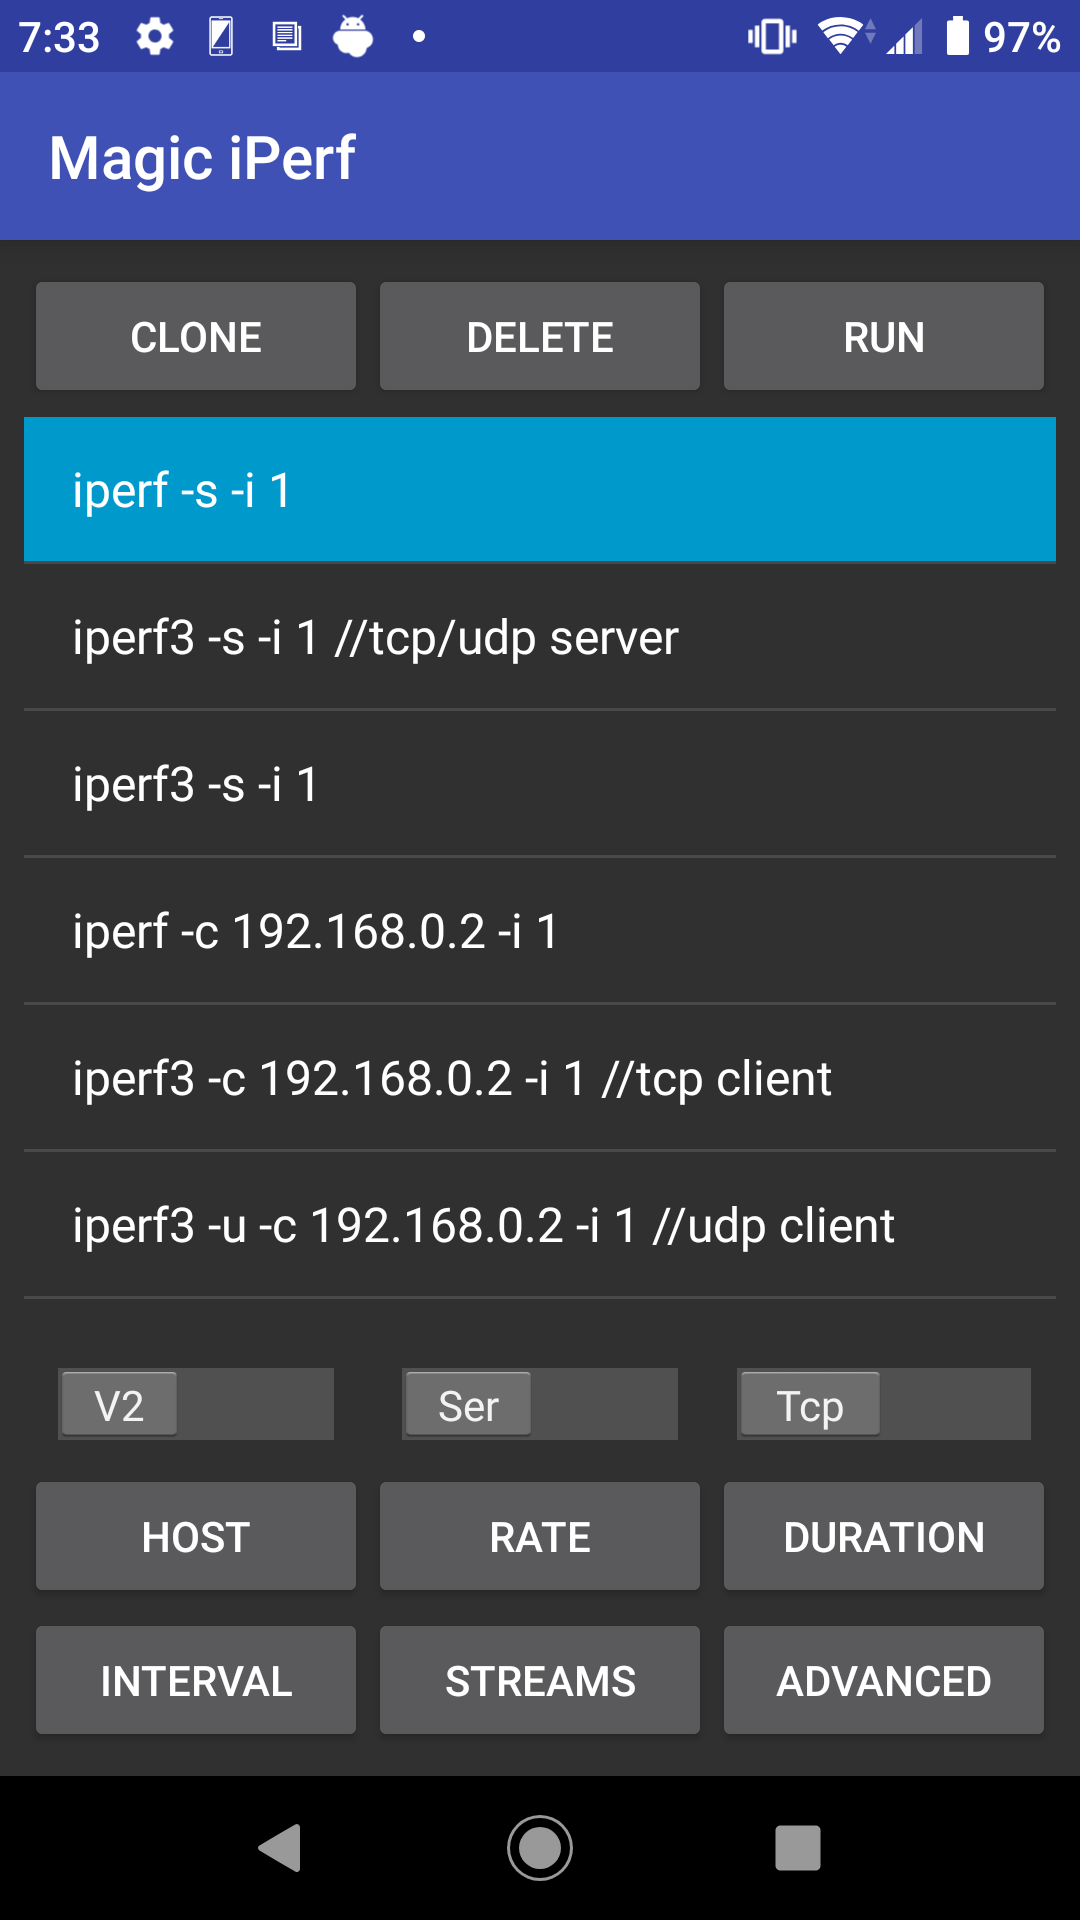
自分でパラメータを設定したい場合は、適当なプリセットをタップしてから「CLONE」をタップしてコピーし、下のボタンから調整したいパラメータをタップして修正します。
速度計測の実行(クライアント側)
Linux
サーバへ接続してテストを開始する場合は、クライアントモードの「-c」オプションを指定します。
iperf3 -c [iperfサーバのIP]
iperfが待ち受けているサーバが「192.168.2.200」の場合は以下のようにします。
iperf3 -c 192.168.2.200
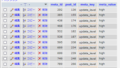
Androidで待ち受けているiPerf3へテストを行った結果です。
Intervalの列は計測区間、Transferの列が実際に転送したデータ量、Bandwidthの列が帯域幅です。
1行目を例にすると「0.00-1.00」とあるので、開始から1秒までの間に、「4.21MBytes」を転送し、35.3Mbpsの速度が出たという意味です。
端末もWi-Fiも少し古いこともあってか、25Mbps~59Mbpsと遅いです。
[root@aimix ~]# iperf3 -c 192.168.2.158
Connecting to host 192.168.2.158, port 5201
[ 4] local 192.168.2.200 port 38550 connected to 192.168.2.158 port 5201
[ ID] Interval Transfer Bandwidth Retr Cwnd
[ 4] 0.00-1.00 sec 4.21 MBytes 35.3 Mbits/sec 20 29.7 KBytes
[ 4] 1.00-2.00 sec 2.98 MBytes 25.0 Mbits/sec 9 45.2 KBytes
[ 4] 2.00-3.00 sec 4.47 MBytes 37.5 Mbits/sec 28 36.8 KBytes
[ 4] 3.00-4.00 sec 7.15 MBytes 59.9 Mbits/sec 65 7.07 KBytes
[ 4] 4.00-5.00 sec 7.08 MBytes 59.4 Mbits/sec 74 7.07 KBytes
[ 4] 5.00-6.00 sec 5.22 MBytes 43.8 Mbits/sec 70 7.07 KBytes
[ 4] 6.00-7.00 sec 3.54 MBytes 29.7 Mbits/sec 71 14.1 KBytes
[ 4] 7.00-8.00 sec 5.03 MBytes 42.2 Mbits/sec 60 17.0 KBytes
[ 4] 8.00-9.00 sec 6.77 MBytes 56.8 Mbits/sec 51 17.0 KBytes
[ 4] 9.00-10.00 sec 6.34 MBytes 53.2 Mbits/sec 63 17.0 KBytes
- - - - - - - - - - - - - - - - - - - - - - - - -
[ ID] Interval Transfer Bandwidth Retr
[ 4] 0.00-10.00 sec 52.8 MBytes 44.3 Mbits/sec 511 sender
[ 4] 0.00-10.00 sec 52.4 MBytes 43.9 Mbits/sec receiver

iperf Done.
SSHで多重ログインするなどして、自分自身のiperfへのテストも行えます。
この場合は、指定するiperfサーバのIPを「localhost」または自分自身のIPを指定します。
Gbps単位の速度が出ます。
[root@aimix ~]# iperf3 -c localhost
Connecting to host localhost, port 5201
[ 4] local ::1 port 36174 connected to ::1 port 5201
[ ID] Interval Transfer Bandwidth Retr Cwnd
[ 4] 0.00-1.00 sec 2.79 GBytes 24.0 Gbits/sec 0 1.31 MBytes
[ 4] 1.00-2.00 sec 1.99 GBytes 17.1 Gbits/sec 0 1.37 MBytes
[ 4] 2.00-3.00 sec 2.61 GBytes 22.4 Gbits/sec 0 1.37 MBytes
[ 4] 3.00-4.00 sec 2.52 GBytes 21.6 Gbits/sec 0 1.37 MBytes
[ 4] 4.00-5.00 sec 2.43 GBytes 20.8 Gbits/sec 0 1.44 MBytes
[ 4] 5.00-6.00 sec 2.00 GBytes 17.2 Gbits/sec 0 1.44 MBytes
[ 4] 6.00-7.00 sec 1.80 GBytes 15.4 Gbits/sec 0 1.56 MBytes
[ 4] 7.00-8.00 sec 2.53 GBytes 21.7 Gbits/sec 0 1.56 MBytes
[ 4] 8.00-9.00 sec 2.38 GBytes 20.4 Gbits/sec 0 1.56 MBytes
[ 4] 9.00-10.00 sec 2.10 GBytes 18.0 Gbits/sec 2 1.56 MBytes
- - - - - - - - - - - - - - - - - - - - - - - - -
[ ID] Interval Transfer Bandwidth Retr
[ 4] 0.00-10.00 sec 23.1 GBytes 19.9 Gbits/sec 2 sender
[ 4] 0.00-10.00 sec 23.1 GBytes 19.9 Gbits/sec receiver

iperf Done.
Windows
Windows版はLinux版と全く同じオプションで、iPerfを「iperf3.exe」とします。
サーバへ接続してテストを開始する場合は「-c」オプションを指定します。
iperf3.exe -c [iperfサーバのIP]
iperfが待ち受けているサーバが「192.168.2.200」の場合は以下のようにします。
iperf3.exe -c 192.168.2.200
1Gbpsのネットワークですが90%くらいの速度が出ていて良い感じです。
S:\tmp\iperf-3.1.3-win64\iperf-3.1.3-win64>iperf3.exe -c 192.168.2.200
Connecting to host 192.168.2.200, port 5201
[ 4] local 192.168.2.2 port 15152 connected to 192.168.2.200 port 5201
[ ID] Interval Transfer Bandwidth
[ 4] 0.00-1.00 sec 104 MBytes 872 Mbits/sec
[ 4] 1.00-2.00 sec 109 MBytes 913 Mbits/sec
[ 4] 2.00-3.00 sec 108 MBytes 903 Mbits/sec
[ 4] 3.00-4.00 sec 109 MBytes 912 Mbits/sec
[ 4] 4.00-5.00 sec 105 MBytes 879 Mbits/sec
[ 4] 5.00-6.00 sec 108 MBytes 903 Mbits/sec
[ 4] 6.00-7.00 sec 103 MBytes 864 Mbits/sec
[ 4] 7.00-8.00 sec 108 MBytes 905 Mbits/sec
[ 4] 8.00-9.00 sec 107 MBytes 897 Mbits/sec
[ 4] 9.00-10.00 sec 110 MBytes 921 Mbits/sec
- - - - - - - - - - - - - - - - - - - - - - - - -
[ ID] Interval Transfer Bandwidth
[ 4] 0.00-10.00 sec 1.04 GBytes 897 Mbits/sec sender
[ 4] 0.00-10.00 sec 1.04 GBytes 897 Mbits/sec receiver

iperf Done.
Android
使用するAndroidアプリによって異なりますが、基本的にはiPerfサーバの「IPアドレス」と「ポート」を指定して実行するだけです。
ポート番号が指定できないアプリもありますが、この場合はiPerf3であればサーバデフォルトの「5201」が使用されます。
「PingTools Pro」での実行例です。
IPアドレスだけ入力した場合はデフォルトポートの「5201」が使われますが、ポート番号を指定する場合は iPerfサーバのIP:ポート番号 の形式で指定します。
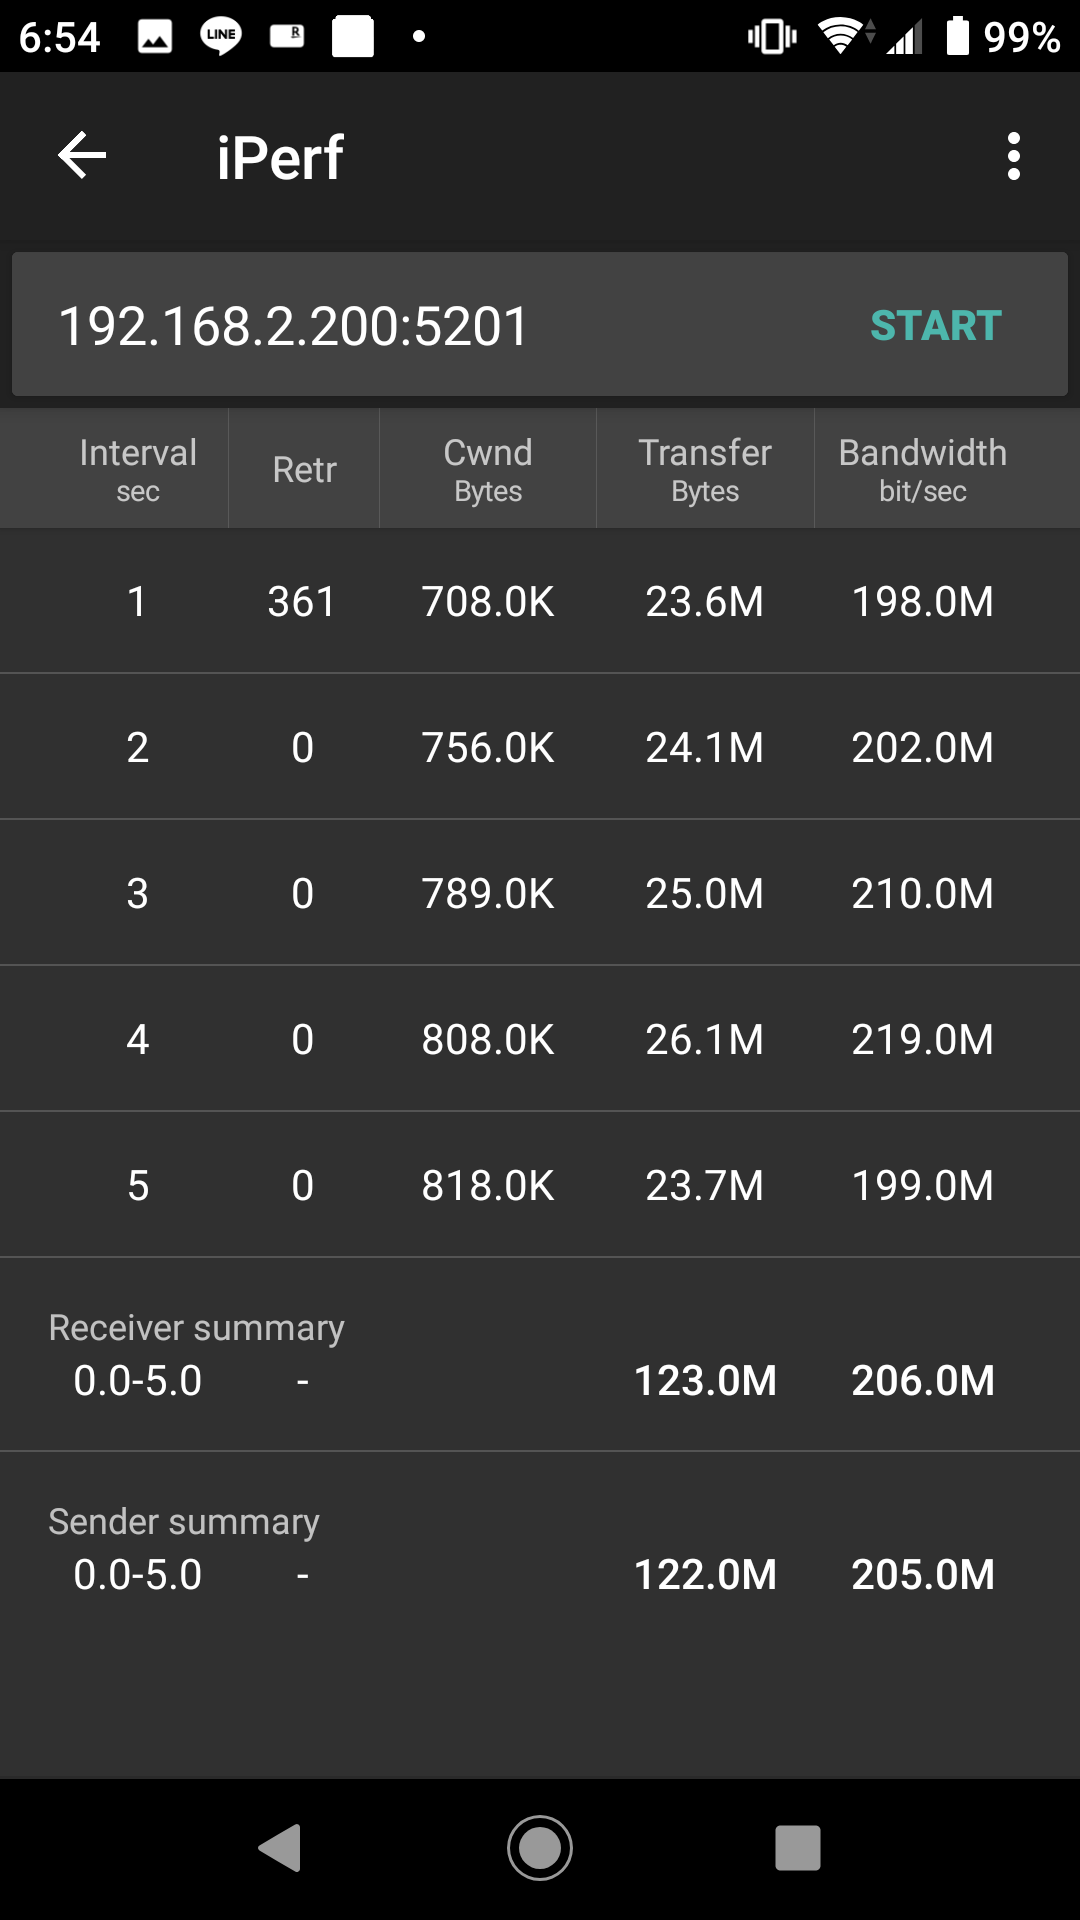
「Magic iPerf including iPerf3」の実行例です。
直接指定する場合は以下のようにします
-c [iPerfサーバのIP] -i 1
iPerfサーバが「192.168.2.200」の場合
-c 192.168.2.200 -i 1
何度も実行する場合はプリセットを修正します。
起動直後の画面右にある「iPerf」アイコンをタップし、「iperf3 -c ~」となっているプリセットをタップし、下部の「HOST」ボタンからiPerfサーバのIPを指定します。

iperfのオプション
iPerfはデフォルトでは10秒間トラフィックを流し、1秒ごとに表示を更新します。
基本的にデフォルト設定のままでOKですが、これらの動きをオプションで変更する場合はサーバIP指定の後にオプションを指定します。
iperf3.exe -c [iperfサーバIP] [オプション]
トラフィックを流す時間を20秒にし、表示を3秒ごとに更新する場合は以下のように指定します。
iperf3.exe -c 192.168.2.200 -t 20 -i 3
iperfのバージョン
[root@aimix ~]# iperf3 -v
iperf 3.1.7
Linux aimix.jp 3.10.0-1160.24.1.el7.x86_64 #1 SMP Thu Apr 8 19:51:47 UTC 2021 x86_64
Optional features available: CPU affinity setting, IPv6 flow label, TCP congestion algorithm setting, sendfile / zerocopy, socket pacing
iperf3 –help
Usage: iperf [-s|-c host] [options]
iperf [-h|--help] [-v|--version]

Server or Client:
-p, --port # server port to listen on/connect to
-f, --format [kmgKMG] format to report: Kbits, Mbits, KBytes, MBytes
-i, --interval # seconds between periodic bandwidth reports
-F, --file name xmit/recv the specified file
-A, --affinity n/n,m set CPU affinity
-B, --bind <host> bind to a specific interface
-V, --verbose more detailed output
-J, --json output in JSON format
--logfile f send output to a log file
--forceflush force flushing output at every interval
-d, --debug emit debugging output
-v, --version show version information and quit
-h, --help show this message and quit
Server specific:
-s, --server run in server mode
-D, --daemon run the server as a daemon
-I, --pidfile file write PID file
-1, --one-off handle one client connection then exit
Client specific:
-c, --client <host> run in client mode, connecting to <host>
-u, --udp use UDP rather than TCP
-b, --bandwidth #[KMG][/#] target bandwidth in bits/sec (0 for unlimited)
(default 1 Mbit/sec for UDP, unlimited for TCP)
(optional slash and packet count for burst mode)
--fq-rate #[KMG] enable fair-queuing based socket pacing in
bits/sec (Linux only)
-t, --time # time in seconds to transmit for (default 10 secs)
-n, --bytes #[KMG] number of bytes to transmit (instead of -t)
-k, --blockcount #[KMG] number of blocks (packets) to transmit (instead of -t or -n)
-l, --len #[KMG] length of buffer to read or write
(default 128 KB for TCP, dynamic or 1 for UDP)
--cport <port> bind to a specific client port (TCP and UDP, default: ephemeral port)
-P, --parallel # number of parallel client streams to run
-R, --reverse run in reverse mode (server sends, client receives)
-w, --window #[KMG] set window size / socket buffer size
-C, --congestion <algo> set TCP congestion control algorithm (Linux and FreeBSD only)
-M, --set-mss # set TCP/SCTP maximum segment size (MTU - 40 bytes)
-N, --no-delay set TCP/SCTP no delay, disabling Nagle's Algorithm
-4, --version4 only use IPv4
-6, --version6 only use IPv6
-S, --tos N set the IP 'type of service'
-L, --flowlabel N set the IPv6 flow label (only supported on Linux)
-Z, --zerocopy use a 'zero copy' method of sending data
-O, --omit N omit the first n seconds
-T, --title str prefix every output line with this string
--get-server-output get results from server
--udp-counters-64bit use 64-bit counters in UDP test packets

[KMG] indicates options that support a K/M/G suffix for kilo-, mega-, or giga-

iperf3 homepage at: http://software.es.net/iperf/
Report bugs to: https://github.com/esnet/iperf

Comment